
Build your own Mealworm Farm and have healthy Protein Snacks for your Backyard Flock
Posted by Chickenstricken on Nov 26th 2019
When we first started out with Chickens, I would run to the store weekly to buy all sorts of treats, organic feed, Protein Snacks and whatever else was offered, just so I could offer my little flock a variety of food. Over the years, as we have added more chickens and as I became a much more experienced Backyard Chicken Keeper, I learned that often times the food offered in the stores contains questionable ingredients, and if you want to buy organic or 100% USA produced it is hardly cost efficient.
Protein is one of the most expensive ingredients to buy, yet it is the most essential part of any Omnivores Diet, with Chickens being way on top of the Omnivore List. Just think of the protein it takes to lay an egg!
Meal Worms are one of the best protein sources there is, and they are actually pretty easy to grow yourself. Ever had a bad batch of flour? Shudder. Yep, those small little worms in there are a kind of mealworm, too. But I am not talking of producing mealworms by storing your flour in a moist environment and letting it get infested. Rather I would like to show you how you can easily grow some high protein power snacks for your Chickens neatly tucked away out of sight in a corner of your house or garage.
While you can grow your Meal Worms entirely in one container, I would recommend setting up a minimum of three. To explain the reason behind this let's go over the live cycle of a mealworm, or better said the Darkling Beetle. The Darkling Beetle is where the whole chain of producing super protein power starts:


A female Darkling Beetle lays hundreds of tiny, white, oval eggs. Within 4 - 19 days these eggs then hatch into tiny mealworms (this is the larval stage). Each mealworm then chows down a tremendous amount of food and grows a lot, shedding its exoskeleton many times as it grows. It then enters the pupal stage. This stage lasts from 2-3 weeks up to 9 months, if the temperature during the pupal stage gets too cold (aka in my case, its winter and my garage might turn too cold). The pupa does not eat and seems inactive and rather dead, but it is busy transforming itself into an adult, much like a caterpillar is transforming into a butterfly. (Although admittedly the result of the transformation is not quite as thrilling in the case of the Beetle). During this stage the pupa is very vulnerable and may fast become food for the ever-growing worms or adult Beetles if not removed – which is why we recommend having more than one container to grow your mealworms.
After pupating, a white adult Darkling Beetle emerges from the shell – its’ exoskeleton has not hardened yet. It soon turns brown and as the Beetle ages almost black. Each adult Beetle lives for a few month, during which the females lay lots and lots of eggs, which you can then again grow into worms. It is an endless cycle of Protein Snack Production !
Getting Started:
Starter Batch - you will need a starter batch of Live Mealworms. I noticed there are now also live Darkling Beetles for sale (see here), but to be honest, I think you get a lot more bang for your buck with the worms, and they literally grow like weeds – fast and plentiful. Plus, you can sneak your chickens a few when you get your shipment …
Housing - Buy three plastic containers, as big or as little as you want. Just make sure they are deep enough for the beetles to not be able to climb up and out – make sure the sides are smooth and vertical, not angled, but no deeper than 6 inches. If you buy them with a lid, poke holes in it, without lids just covering them with a fine wire- mesh and sealing the sides with Duct Tape will prevent any escape artists as well as moth and other insects getting in. More room means of course more worms, as there is plenty more room for feed and to move around and nest.Label each bin – one Worms, one Pupae and one Beetles.

Or, if you want to somewhat automate your “production” buy a setup like this here.
Food - All you really need as bedding and feed is wheat bran, cornmeal or oatmeal (finely shredded) and a few veggie scraps for moisture, although some people go all out and make a complete “layer feed mix”, consisting of

wheat bran, or a 3:1 ratio of wheat bran to dried skim milk, or 4 layers: 1/4" layers of chick feed (non-medicated), separated by layers of burlap or shredded newspaper, or 10 parts oat or wheat kernels, 10 parts whole wheat flour, 1 part wheat germ or powdered milk; and 1 part brewer’s yeast.
Personally, I just grind up oatmeal or use wheat bran, whichever I have at hand, and add a few slices of veggies such as carrot, celery or potato. After all, I am not trying to raise gourmet protein worms, just plain old mealworms. On occasion I may throw in a handful of organic chick feed if I want to speed up the growing process.

Sifter and / or tweezers - If you don’t want to dig for worms, pupae and beetles by hand I recommend you get you some kind of sifting device. For me, this cat litter scoop works great since it is flatter than most others; hot glue a piece of wire mesh to it if you need it to pick up smaller worms. This will also enable you to pick out the pupae, if you are grossed out by doing it by hand, just use tweezers. You can pick up a pair at the dollar store.
Add a layer of your food mixture into each container, about 1-2 inches deep. Be aware that the worms eat the most food, as they constantly grow and shed exoskeleton, so don’t be stingy in that container or the worms will literally die of starvation. Add some veggie slices for moisture, but make sure to remove them every so often when they start to mold. Don’t use something super moist, like tomato! You can also throw in some cut up egg carton lids, as the beetles as well as the worms like it dark, they like to hide under something.
Dump your worms into the bin labeled Worms and watch them go to town on the food. Or put a lid on it as fast as you can, depending on your level of being grossed out. You will have to check on the worms on occasion though, to add food and replace the veggie slices. If the veggies don’t have mold on them but still the occasional worm attached – toss them to your chickens and delight in the excitement to follow.
As the worms age they will become darker in color. Depending on what size and age they were when you purchased them, this can take up to 4 weeks. Take your sifter and dig through the bin on occasion, once you see some pupae in there, remove them and put them in bin labeled pupae.
The pupae won’t move and also don’t need any food until they hatch, and a white beetle emerges. The beetles quickly turn darker in color and will turn brown within a week. At this stage, make sure to remove them as they will start eating the pupae. Pick out the beetles and add them to your Beetles Bin, where they females will start laying eggs, which will hatch into tiny, light colored mealworms within a week or two, depending on the temperature. Once hatched, remove the worms with your handy dandy sifter and add them to the worm bin. Feel free to dig through your worm bin and remove as many Protein Snacks as you like to feed to your chickens. Just leave some in there to turn into pupae.
Voila! – your Mealworm Protein Snack Power Farm is complete !
If you want to automate your process a bit more and do less sifting you can set up a farm containing several bins lined up, each bin containing one stage in the development. One for Beetles, the next one for Eggs, the next one for newly hatched worms, next growing Worms, Harvest Worms, Pupae and back to Beetles. Instead of having to sift through you simply dump one bin into another and then add a layer of feed again. My setup looks like this:
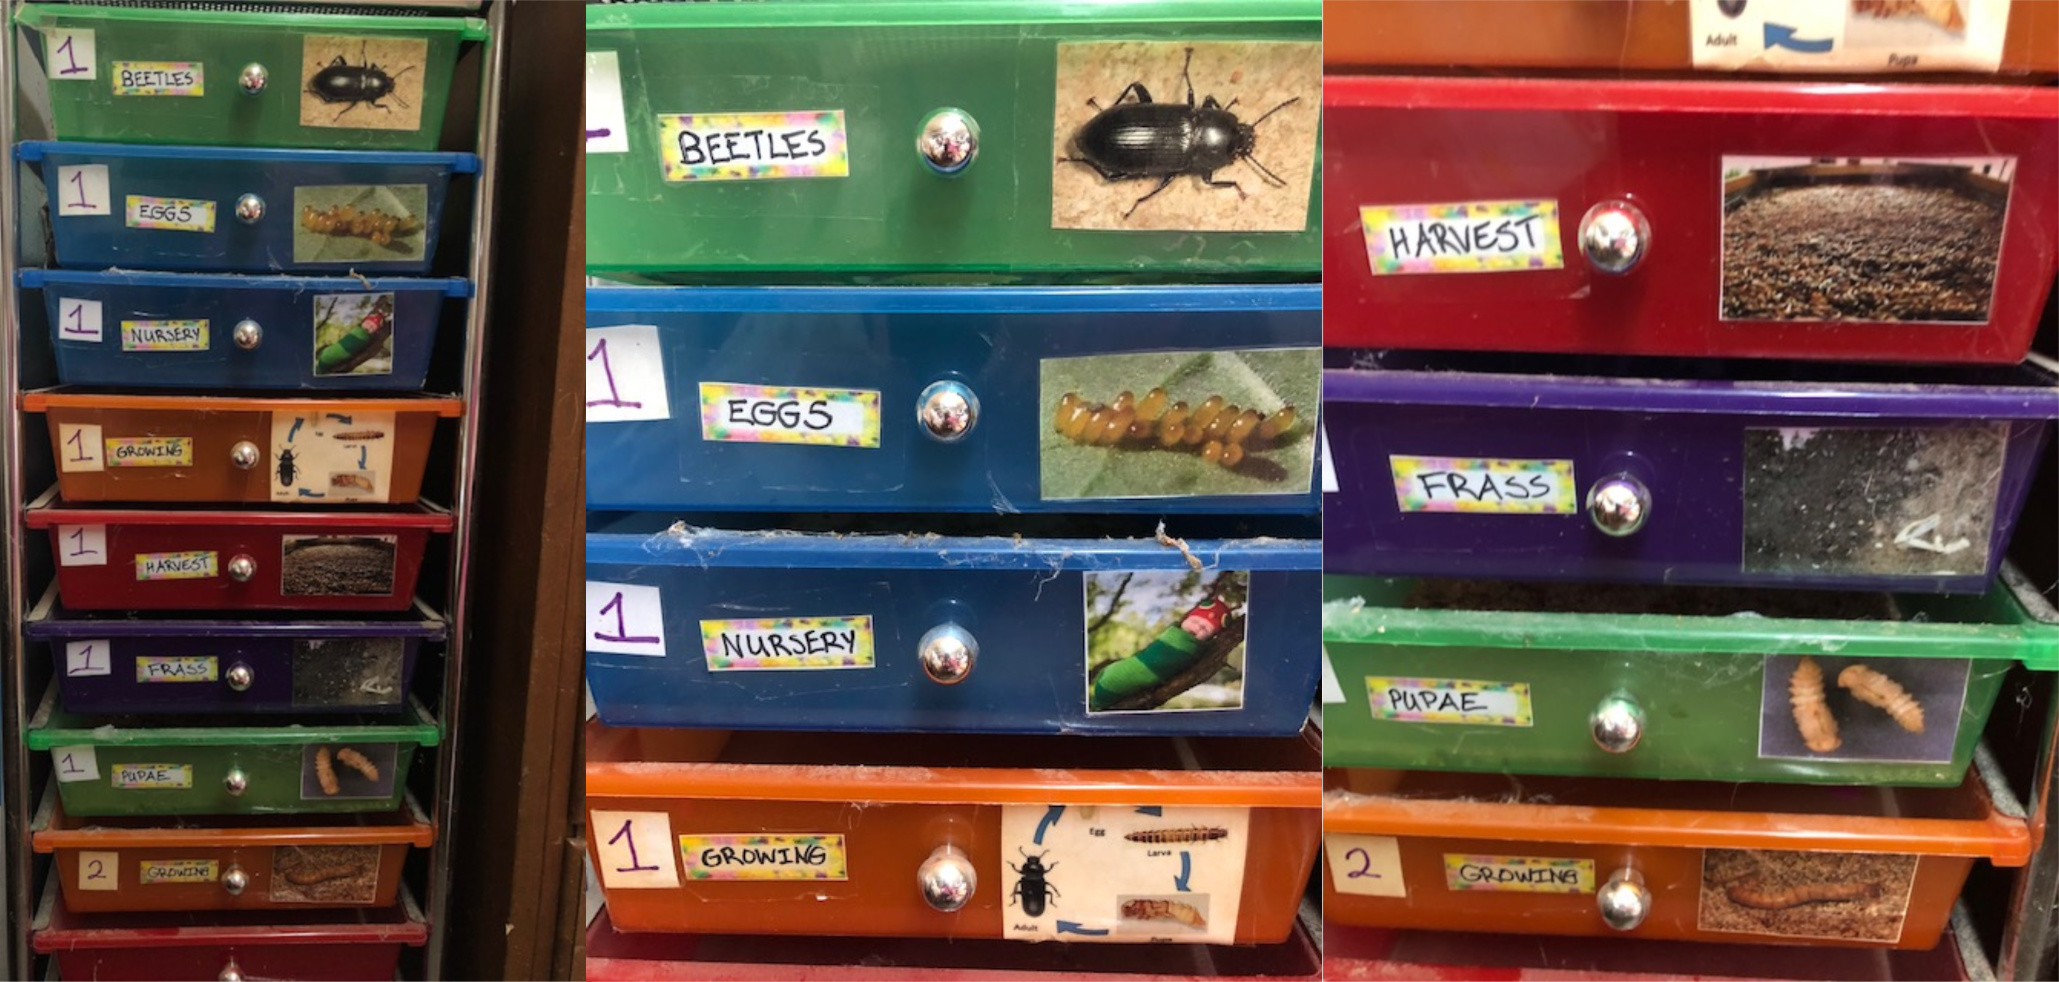
The top bin contains the beetles. I have cut several holes in the bottom that I then covered with mesh.

You can use wire-mesh also, but you would have to glue it down so the beetles cannot crawl under it. I just used a plastic mesh canvas sheet, which I laid in the bottom. Fill with Feed, then add the beetles. As the beetles move around, the eggs get dropped into the bin underneath. After about 3 weeks the first worms hatched and I empty the egg bin into the bin below labeled “Nursery” (which also has food in it), fill the “Egg” bin back up with some feed and put it back under the beetles.
After about another 2-3 weeks I check on the Nursery bin – which has a bunch of worms in it now – and dump it in the bin below labeled “Growing 1”, which should have lots of food as the worms will now start their growing spurt. Give it another 3 weeks and empty the contents into the bin labeled “Harvest”, which still should have some food added. The harvest bin also has holes in it, covered with mesh. As the worms eat and digest, the “Frass” (basically worm poop) falls through to the next bin labeled “Frass”. Leave the worms in the “Harvest” bin for about a week and they will have eaten most of the food – you can check on that occasionally - leaving you with nothing much other than pure worms and some Pupae. Pick out the Pupae whenever you need to replenish some of your beetle population and put them in the “Pupae” bin, or grab some large and dark worms from the “Harvest” bin and put them in there as they are just about ready to turn into pupae. I also have an extra Growing Bin in case I have too many worms at once, with an extra Frass bin underneath.

The Frass is a natural source of compost that can be used as is, added to potting soil or to make compost tea. Use the contents of your Frass bin whenever you have the need for an extra plant booster. It makes an excellent addition to your Home Composter as a starter.
This set up is one of the simplest and cleanest that I have experimented with. All you need to do is remember when to add more food or alternate the bins.
If you want to store some worms and don’t have a home freeze dryer such as Harvest Right, you can freeze them in a regular freezer (I recommend double checking that the bag is closed and double bagging!) or dry them in the oven on a baking sheet. Who knows – you may want to add some healthy Protein to YOUR diet while you are at it ?